


Bradyarrhythmias caused by sinus node dysfunction and atrioventricular (AV) blocks are more common in patients in ages 70s-80s,1 and up to 20% of the patients presenting with bradycardia may need a temporary transvenous pacemaker for initial stabilization.2
Placement of a temporary transvenous pacemaker is a potentially lifesaving procedure that can be performed in the setting of unstable brady- or tachyarrhythmias. Temporary transvenous pacing (TTVP) utilizes central venous access to pass an electrode into the right ventricle.
TTVPs are one of the most infrequently performed procedures by emergency physicians;3 however, it is essential for those working in any setting with critically ill patients to be well-equipped to perform this procedure emergently.
Determine: Does your patient need to be transvenously paced?
Unstable (hypotension, loss of pulses, altered mental status, etc.) PLUS one of the following:
- Sinus bradycardia
- 2nd degree AV block, Mobitz type II
- 3rd degree (complete) AV block
- Overdrive pacing - suppressing tachydysrhythmias such as polymorphic VT
- Drug overdose/toxicity
Assemble your equipment (Figure 1)
- Sterile skin prep, drapes
- Lidocaine
- Syringe with needle
- Scalpel
- Guidewire
- Sheath introducer (5.5 or 6.5Fr)
- Dilator
- Sterile sheath
- Suture/needle driver
- 3 mL syringe
- Pacing catheter
- Alligator clip (attaches to ECG lead)
Figure 1. Supplies commonly found in TVP kits (image by A. Hallagan, MD)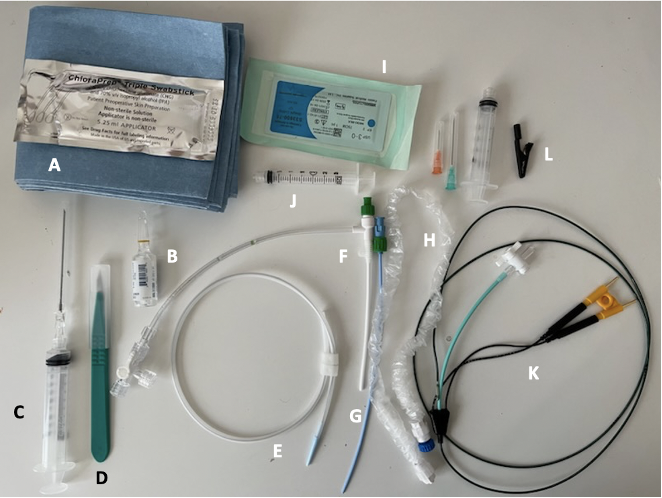
External Pacing Generator
Rate: Determines the pacing rate. Typically set at least 20 beats higher.
Output: Allows for regulation of the current the patient receives, typically ranges from 0.1 to 20mA
- If there are two settings for "A" for atrial and "V" for ventricular, set the "A" output at 0 at all times.
Sensitivity: Establishes a threshold required to suppress the pacemaker from firing, based on amplitude of the native R wave. Ranges from 0.5 to 20 mV.
- Turning sensitivity knob down, but increasing the number = increase the threshold that is required to detect R wave
Turning the sensitivity "up" but decreasing the number, for example to 0.5mV, will sense the patient's underlying rate, and the pacer will not fire if the patient's rate is equal or faster.
Figure 2. Medtronic external pacing generator (image by A. Hallagan, MD)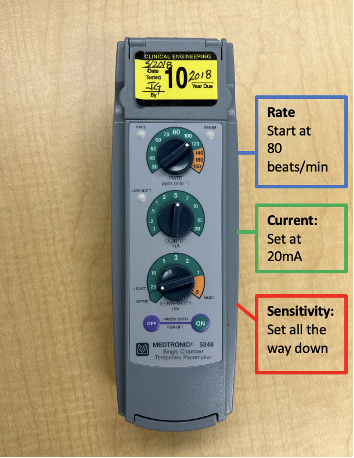
Set up your generator prior to obtaining central access.
Insert pacer into generator. The proximal wire inserts into the positive port, and the longer, distal wire inserts into the negative port.
Initial settings should be set as follows (see figure 2)
- Rate: 80 beats per minute
- Output (current): Set at 20mA
- Sensitivity: Turned all the way down or set to asynchronous
Obtain central venous access
Site selection: Right internal jugular is recommended, as it provides a direct anatomical route to the right ventricle. Left subclavian is a reasonable second choice, but should be reserved for placement of a permanent pacemaker if possible.
Percutaneous sheath introducer insertion: Obtain access by blind or ultrasound guidance as preferred by the provider. The introducer sheath is sometimes referred to as "Cordis"(owing the name to the brand that makes them) used in trauma resuscitation.
The dilator and introducer sheath are inserted together as one unit over the guidewire.
Remove the blue dilator, unscrewing the green portion.
Secure the sheath introducer in place (as shown in figure 3). You are now ready to float your pacer.
Figure 3. Sheath introducer + dilator (image by A. Hallagan, MD)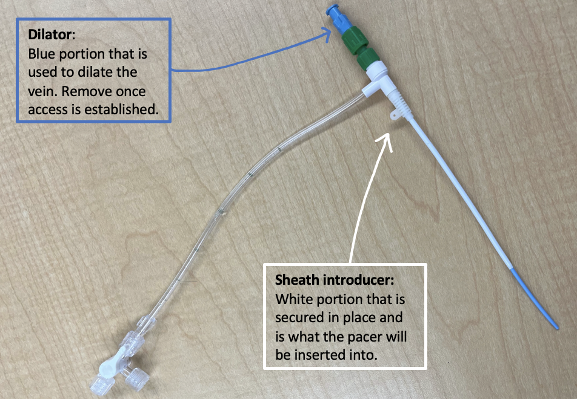
Figure 4. Sheath introducer with wire, sheath, electrodes, and syringe (image by A. Hallagan, MD)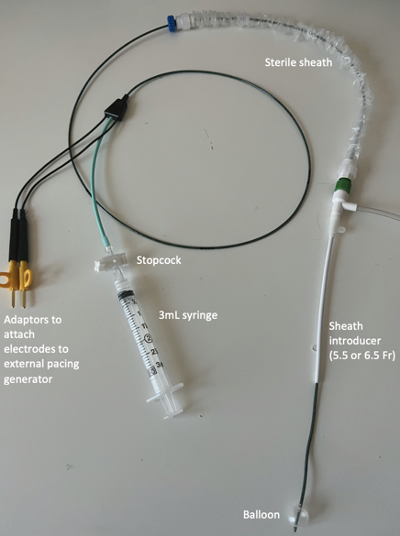
Pacer wire insertion (aka "floating the pacer")
- First, check the balloon for a leak. Inflate with 1.5cc of air, utilizing the designated 3mL syringe.
- Place sterile swan sheath over the pacer wire, ensuring that it connects to the introducer on one end. This must be done before insertion.
- Insert pacer wire into the introducer sheath with the balloon deflated. The curve of the coil should face the intended direction of travel.
- Advance the pacer wire to 20 cm.
- Ask assistant to inflate the balloon.
- Advance until capture is achieved. Verify by identifying BBB pattern after every pacemaker spike. Figure 5 shows the various patterns that may be seen and corresponding location.
- Deflate the balloon (prevents the wire from migrating out of RV) and turn stopcock to "off" position.
- Extend swan sheath and lock into place.
- Obtain CXR to confirm placement.
- Adjust your settings: turn the output (current) down until you lose capture. Set output to 2.5x this level to gain the capture back, typically between 2-3mA.
Figure 5. Typical intracavity ECG (reprinted with permission)7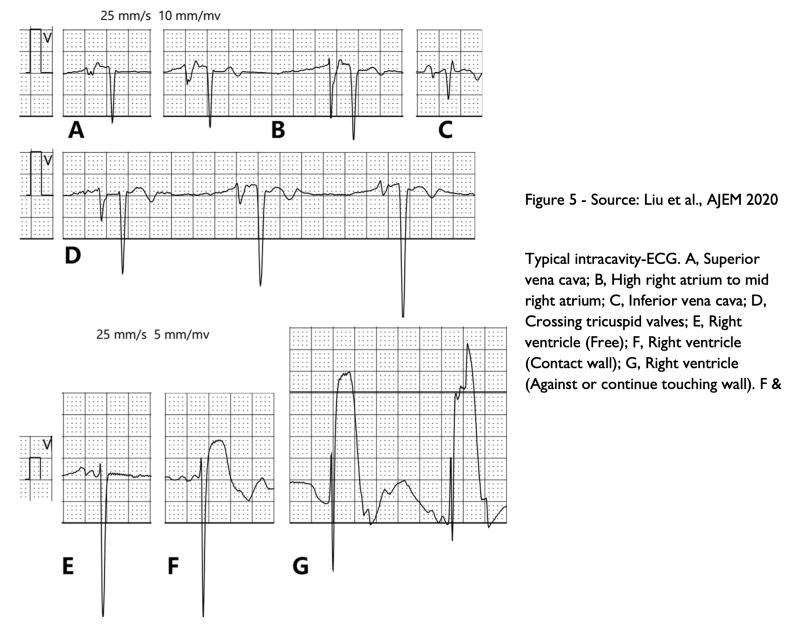
Troubleshooting and Other Considerations
- Unable to gain capture: If at 30 cm and still unable to gain capture, remove the wire and reintroduce it.
- Consider utilizing bedside ultrasound to visualize pacing wire entering the RV.
- Sensitivity adjustment: Currently your generator is set to asynchronous, or pace regardless of underlying intrinsic rhythm. If demand or synchronous pacing is the goal, then adjust sensitivity to sense underlying bradycardic rhythm8
Complications9
- Device: Lead dislodgement, lead failure, multiple attempts, re-intervention
- Complicated access: Bleed, vascular injury, pneumothorax
- Arrhythmias
- Infection
- Cardiac perforation: Watch for signs of tamponade
- Thrombosis
References
- Kusumoto FM, Schoenfeld MH, Barrett C, et al. 2018 ACC/AHA/HRS guideline on the evaluation and management of patients with bradycardia and cardiac conduction delay: A report of the American College of Cardiology/American Heart Association Task Force on Clinical Practice Guidelines and the heart rhythm society. Circulation. 2019;140(8)e382-e482.
- Sodeck GH, Domanovits H, Meron G, et al. Compromising bradycardia: Management in the emergency department. Resuscitation. 2007;73(1):96-102.
- Gottlieb M, Jordan J, Krzyzaniak S, et al. Trends in emergency medicine resident procedural reporting over a 10-year period. AEM Educ Train. 2023;7(1):e10841.
- Harrigan RA, Chan TC, Moonblatt S, Vilke GM, Ufberg JW. Temporary transvenous pacemaker placement in the Emergency Department. J Emerg Med. 2007;32(1):105-111.
- Blanco P. Temporary transvenous pacing guided by the combined use of ultrasound and intracavitary electrocardiography: a feasible and safe technique. Ultrasound J. 2019;11(1):8.
- Roberts JR, Hedges JR. Ch 15 Emergency Cardiac Pacing in Clinical Procedures in Emergency Medicine, 5th ed. Elsevier, Philadelphia, PA. 2010.
- Liu M, Han X. Bedside temporary transvenous cardiac pacemaker placement. Am J Emerg Med. 2020;38(4):819-822.
- Michael Self, Christopher R Tainter. “Overdrive pacing” StatPearls,April 2023.
- Tjong FVY, de Ruijter UW, Beurskens NEG, Knops RE. A comprehensive scoping review on transvenous temporary pacing therapy. Neth Heart J. 2019;27(10):462-473.